Two metallic NYE aesthetics, one confident choice. Compare color palettes, balloons, backdrops, and table styling tips to land on a look that photographs bea...
The Festive Dwell
10 Pro Tips for a DIY Balloon Garland Backdrop
Make a balloon garland backdrop that looks professionally styled. Get Clara’s best tips for sizing, color palettes, inflation, structure, and stress-free setup for any party.

Clara Jenkins
Clara Jenkins is a former visual merchandiser and lifelong holiday enthusiast who believes every season is worth celebrating. She helps readers transform their everyday spaces into magical, welcoming homes through budget-friendly DIYs, elegant tablescapes, and clever styling tricks. When she isn't untangling fairy lights or hot-gluing autumn wreaths, Clara can be found hunting for vintage ornaments at local flea markets.
Published October 17, 2026
Updated October 17, 2026
I have a soft spot for balloon garlands because they deliver maximum “wow” with very little commitment. No repainting. No permanent holes. Just a cloud of color that makes even a simple living room corner feel like a party venue.
The secret to a backdrop that looks professional is not expensive balloons. It is planning, structure, and a few tiny styling moves that keep the whole thing from looking like a lumpy caterpillar (we have all been there).

Before you start: what you actually need
Gather your supplies first, then inflate. Balloon garlands get chaotic fast once you have 60 balloons rolling across the floor.
- Balloons in 2 to 4 sizes (5-inch minis, 10 to 12-inch, and a few 18-inch are my go-to mix)
- Balloon decorating strip (also called garland tape)
- Balloon pump (hand pump works, electric saves your wrists)
- Glue dots or low-tack balloon glue
- Fishing line or clear monofilament (for extra support)
- Command hooks, removable wall hooks, or backdrop stand clamps
- Scissors and balloon tying tool (optional but very helpful)
- Optional styling extras: faux greenery, fresh eucalyptus, ribbon tails, tissue tassels, disco balls, paper fans
Balloon quality note: If you can, buy latex balloons from a party supplier. They inflate more evenly and are less likely to pop mid-install. That is the kind of calm I like before guests arrive.
Quick method (so you have a roadmap)
If you like a linear checklist before you get lost in the fun details, this is my go-to flow:
- Plan your shape and anchor points (mark start, middle, end on the wall or stand).
- Inflate balloons in batches, mixing sizes and slightly varying diameters.
- Attach balloons to the decorating strip, building 4 to 6-foot sections you can handle.
- Reinforce with fishing line by weaving it through every few strip holes, then tie off each section.
- Hang and anchor top, middle, and tail.
- Rotate for the “full side”, then fill gaps with 5-inch minis using glue dots.
- Add one finishing touch (greens, ribbons, seasonal accents), clustered in 2 to 3 spots.
10 pro tips for a photo-ready balloon garland backdrop
1) Plan your backdrop like a display wall
My visual merchandiser brain always starts with the “frame.” Think of it like creating a border around the moment you want people to look at first.
Decide what the picture moment is: a dessert table, a gift table, a high chair, a front door entry, or a blank wall with a cake stand.
Then choose one of these reliable shapes:
- Corner sweep: Garland starts high on one side and drapes down the other. Easiest and most forgiving.
- Half arch: Garland curves around one side of a circle hoop or stand.
- Topper: Garland runs across the top of a backdrop stand or curtain rod for a clean “stage” feel.
- Full frame: Garland outlines a rectangle (stunning, but the most time-intensive).
Pro move: mark your start and end points with painter’s tape on the wall so you are not eyeballing it at the last second.
2) Use a hero color plus supporting neutrals
The fastest way to get a cohesive look is to pick:
- 1 hero color (the one you want people to remember)
- 1 supporting color (a shade lighter or deeper)
- 1 neutral (white, ivory, beige, or clear balloons)
- 1 accent (metallic gold, silver, or a bold contrast in small doses)
Seasonal palette ideas I love:
- Halloween: matte black + orange + sand + a few chrome gold
- Holiday party: deep green + ivory + gold + a few red minis
- Spring brunch: blush + butter yellow + white + a touch of sage
- Baby shower: dusty blue + cream + taupe + clear confetti accents

3) Mix sizes on purpose, not by accident
Professional garlands look “full” because they have depth. Depth comes from size variety.
- Base balloons: mostly 10 to 12-inch balloons
- Texture balloons: clusters of 5-inch minis tucked into gaps
- Statement balloons: a few 18-inch balloons spaced out (not all in one spot)
If you only use one size, your garland tends to look flat on camera. A quick scatter of 5-inch minis fixes that instantly.
4) Inflate to slightly different sizes for an organic shape
Here is a tiny trick with a big payoff: do not inflate every 11-inch balloon to the exact same diameter.
Instead, inflate within a range, for example:
- Some at about 9 inches
- Most at about 10 to 11 inches
- A few at about 12 inches
This variation makes the garland feel airy and designer-styled, not like a row of identical bubbles.
5) Underinflate slightly for fewer pops and a softer look
If balloons are filled to their absolute limit, they pop more easily during installation and in warm rooms. Underinflate just a touch so the balloon is rounder and less stretched. It also tends to read less overstretched on camera.
Heat tip: If your party is outdoors or you are installing near a sunny window, inflate more conservatively. Warm air expands.
6) Build your garland in sections you can actually handle
A 10-foot garland is awkward to move through doorways and around furniture. I prefer building in 4 to 6-foot sections, then connecting them on the wall or stand.
How to connect sections:
- Overlap the ends by a few balloons
- Use the decorating strip holes to weave balloons through both sections
- Add a short piece of fishing line to “stitch” them together for extra security
This also makes storage and transport much easier if you are decorating at a friend’s house or venue.
7) Use the strip for speed, then use fishing line for strength
The balloon strip is your fast assembly tool. Fishing line is your safety net.
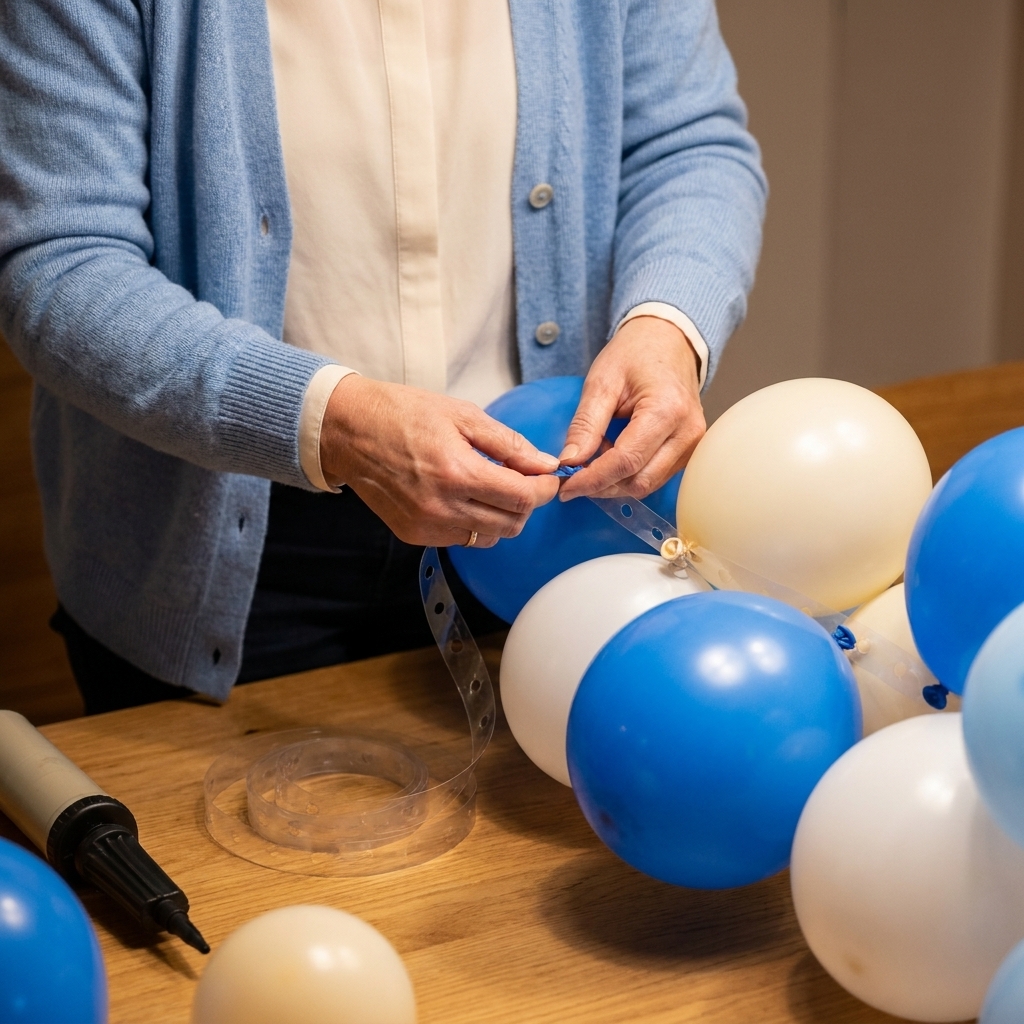
- Thread balloons into the strip until the section is full.
- Run fishing line through the backbone by weaving in and out of the strip holes every few inches, then tie off the ends.
That fishing line backbone helps the garland keep its shape and prevents sagging, especially on longer runs or on a backdrop stand.
8) Anchor like a pro: three points is the sweet spot
The most common DIY issue is a garland that slowly droops, twists, or slides down the wall. Three anchor points prevent that: top, middle, and tail.
Try one of these anchoring methods:
- Wall install: removable wall hooks plus fishing line loops tied around the garland backbone
- Backdrop stand: zip ties (best) or sturdy clamps. If you use tape, make it a backup, not the plan.
- Hoop stand: sturdy zip ties every 8 to 12 inches
Rental-friendly tip: Put the hook on the wall, then tie fishing line to the garland and loop it over the hook. Avoid sticking adhesive directly to balloons. It is messy and unpredictable.
Wall surface reality check: Textured paint, brick, and dusty walls can make removable hooks fail. If your wall is questionable, use a freestanding backdrop stand, a hoop stand, or a tension-rod style frame instead of gambling on adhesive.
9) Hide gaps with balloon clusters, not more strip work
When you hang the garland, you will see thin spots. That is normal. Do not take the whole thing down to fix it.
Instead:
- Make a cluster of 3 to 5 mini balloons (usually 5-inch)
- Attach the cluster with glue dots right where the gap is
- Tuck minis slightly behind bigger balloons for a layered look
I keep a handful of 5-inch minis uninflated until the end, then inflate them to custom sizes as my “gap fillers.”
10) Finish with one styling element that matches the season
This is the part that takes your backdrop from “birthday store aisle” to “custom celebration.” Choose one finishing element and repeat it lightly throughout.
- Holiday party: tuck in pine picks or velvet ribbon tails
- Baby shower: add soft faux greenery and a few satin bows
- Summer: add citrus leaves or palm fronds (real or faux)
- Halloween: add black ribbon and a few mini faux bats near the edges
Keep it clustered in 2 to 3 spots, not evenly scattered everywhere. Clustering reads intentional on camera.

My go-to sizing cheat sheet
If you just want a reliable starting point, here is what I use for most home parties. Consider these approximate ranges. Your final count depends on balloon sizes, how tight you pack the strip, and how many 5-inch minis you use (minis add up fast).
- 6-foot garland: about 60 to 80 balloons total
- 8-foot garland: about 90 to 120 balloons total
- 10-foot garland: about 120 to 160 balloons total
That total includes your minis and any 18-inch balloons. If you are doing a super lush, extra-thick garland, bump it up by 20 to 30 percent.
Fast troubleshooting (because balloons love drama)
My garland looks sparse
- Add 5-inch minis with glue dots
- Rotate the garland so the fuller side faces forward
- Increase size variation so the shape feels layered
My garland is twisting
- Add a middle anchor point
- Tie a short fishing line “guide” from the garland to the wall or stand to control rotation
Balloons are popping during install
- Underinflate slightly
- Keep balloons away from textured walls, brick, and sharp chair corners
- Do not install in direct sun or near heat vents
The colors look off in pictures
- Swap bright white balloons for ivory if your lighting is warm
- Add a neutral balloon color to soften strong hues
- Move your backdrop away from green walls that can cast color
Balloon garland timing: when to make it
For indoor parties, I like to build the garland the day before or the morning of. Latex balloons will slowly dull over time (that slightly matte haze), especially with sun exposure and ozone in the air.
If you need it to look fresh for pictures:
- Assemble the day before, but do the final mini-balloon gap filling right before guests arrive
- Keep it in a cool room away from sun while you prep food and tables
- If it starts looking hazy, a quick wipe with a clean microfiber cloth can help. Shine spray works too, just be mindful of overspray on floors.
Safety and cleanup notes (quick but important)
- Skip helium for garlands. Air-filled balloons are cheaper, more stable on stands and hooks, and they last longer.
- Keep popped pieces away from kids and pets, especially pets who love to snack on rubbery things.
- Dispose thoughtfully: pop and bag balloons so they do not blow away outdoors.
My favorite party picture corner
If you want the easiest picture setup that looks styled, do this:
- Hang a garland in a corner sweep shape
- Add a small table or pedestal with the cake or a few wrapped gifts
- Place one floor item like a lantern, a basket of favors, or a cluster of candles (battery candles for stress-free safety)
- Keep the wall area clear so people can stand in front without bumping decor
It is simple, it photographs beautifully, and it gives guests a natural place to gather.